
 Welcome
to the Voyager 1700 Section in the Tech Center of the AVA Web
Site. This is a new section and will take some time to
acquire tips from our members. The newest 1700 Tech Tips may first be
displayed in the Tech Tips - Voyager 1700 V-Twin section of the AVA Message
and Information
Forum.
Welcome
to the Voyager 1700 Section in the Tech Center of the AVA Web
Site. This is a new section and will take some time to
acquire tips from our members. The newest 1700 Tech Tips may first be
displayed in the Tech Tips - Voyager 1700 V-Twin section of the AVA Message
and Information
Forum.
Additional Tips will be periodically added.

|
American Voyager AssociationVoyager 1700 Tech Tips
|
 |
|
|
|
Installing
Heated Grips
Installing the MCHitch How
to wire your 1700 for a trailer
|
The Tech Center does not contain all available tech tips for the Voyagers, the most recent are contained in the hardcopy newsletters, with still others contained in the Tech Tips Manual. A combination of all three will yield the greatest array of Tech Tips available. Not a member? JOIN, anyone may also purchase a Tech Tips Manual of past tech tips. NOTE: Although this information is to the best knowledge of the submitting persons, neither the American Voyager Association, or any of it's board members, officers, members, submitting authors, or the webmaster of this site will be responsible for any negative results using any information contained in the Tech Center, those using this information are completely responsible for the results.
Engine Heat
Frayed Wire Insulation Under the Gas Tank
The wires are located upper left front near the ignition switch. You need to take off trim, gently work off ignition trim (round piece that goes around lock). Pop seat and unbolt 2 bolts where the seat connects into the bracket up front by the bottom of the tank. You don't need to take the tank completely off, just move it enough to remove it from front rubber mounts and let it rest on the mounts while you go to work with electrical tape. When putting tank back on round rubber mounts up front, pay attention to the rubber line that is on right front side. You don't want to get that caught up with the bracket that fits into the rubber mounts. Once lined up on rubber mounts (use flashlight to inspect both sides) gently apply pressure to the top of the tank and push down. Use a soft cloth across the tank so you don't scratch the tank. Also it would be a good time to put fresh coat of wax on before putting trim back on. Kickstand Does your 1700 lean over too far on the kickstand for you? A kickstand from a Vulcan VN1500 is a direct replacement and is about 2" longer than the stock 1700 stand. Just be careful when parking on slopes that lean the bike the wrong way! If the bike it too upright, wind could push it over! Oil Level Checking Procedure
After all of the oil is settled make sure your Vulcan 1700 is on level ground and off the kick stand. Remove the oil dipstick, clean it and re-install it, screwing it all the way down. Remove it again and take your oil level reading. If you do not allow the unit to idle for a time or fully screw in the dipstick you may get a false oil level reading and overfill the engine with oil. Too much oil may result in the excess oil being pumped into the air cleaner and leaking onto the ground. Click Here for Kawasaki's PDF Instructions
Oil Screen Maintenance The oil screens on 2010 and newer Voyager 1700s DO NOT NEED TO BE CHECKED unless some major mechanical malfunction happens...this is strait from Kawasaki themselves. -- Mike Pisarski Quick Change Trunk
Radio Antenna Option If your 1700 has a CB and you like symmetry and a balanced look, consider replacing the stock radio antenna with a replacement auto one. You may also get better reception in the bargain. Go to AutoZone (or similar) and get a 31" black spiral replacement antenna for a vehicle. It will cost about $12.99. See installation instructions on the AVA Forum here. Radio Reception 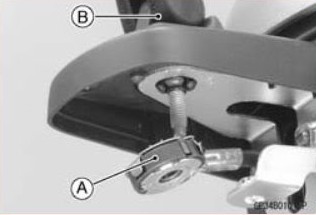
Poor radio reception may be due to a grounded
antenna.
The photo at right is the antenna mount and cable connector. Remove the
connector A and check that the lower "washer" on the connector is
connected to the cables middle conductor and the upper "washer" is
connected to the cables shield. It gets grounded from the mounting
bracket when the connector is installed... the ground source is from
the bracket grounded to the frame. With an ohm meter make sure there is
no continuity between the two washers. Tire Removal (Rear) If you follow the Kawasaki manual you have to remove the rear trunk, the chrome trim, the saddlebags, the saddlebag mounts and the muffler just to be able to get the rear axle out. Instead, just remove the saddlebags (3 bolts each) and rear shocks (2 nuts each), prop the rear wheel up and pull the axle out above the saddlebag mount. The right shock comes off easily, just remove the nuts and slide it sideways, the left side chrome trim needs to be loosened enough to pull it sideways to get the shock to clear the stud. Have the bike high enough to drop the wheel out the bottom, most lifts have a hinged rear section for doing this. -- Garry VanderEyk Trunk Tray Removal To remove the bottom tray from the trunk you need to remove four plastic locking pins. To remove them, push the center in about 1/4 inch which will release the locking mechanism. Then just lift under the top cap with your finger nails and they will come right out. To install, push the center pin out the top about 1/4" and insert into the hole. Then just push the center pin in flush with the top. -- Rod Westphal |

 Too much heat from your engine? A number
of
Vulcan Voyager 1700 owners swear by a radiator coolant called Engine
Ice. They claim the engine runs noticeably cooler and that there is much
less heat coming off the engine. Visit the
Too much heat from your engine? A number
of
Vulcan Voyager 1700 owners swear by a radiator coolant called Engine
Ice. They claim the engine runs noticeably cooler and that there is much
less heat coming off the engine. Visit the 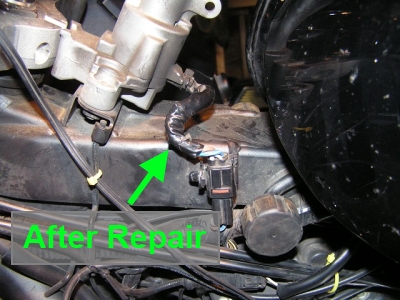 Numerous
1700 owners have found that the wires
that go into the bottom of the ignition tower rub against the gas tank
or frame causing them to wear through the insulation which causes a
dead
short, causing the main 30 amp fuse to blow, completely shutting down
all systems on your bike. This always happens when you're miles from
nowhere, of course. To protect yourself, inspect these wires and wrap
them in electrical tap, plastic loom, rubber, or what have you. It's
usually the brown wire but wrap all of them.
Numerous
1700 owners have found that the wires
that go into the bottom of the ignition tower rub against the gas tank
or frame causing them to wear through the insulation which causes a
dead
short, causing the main 30 amp fuse to blow, completely shutting down
all systems on your bike. This always happens when you're miles from
nowhere, of course. To protect yourself, inspect these wires and wrap
them in electrical tap, plastic loom, rubber, or what have you. It's
usually the brown wire but wrap all of them.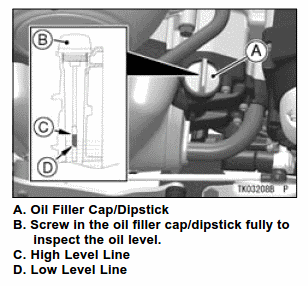 Due to the semi-dry sump lubrication system on the Vulcan 1700 models there is a special oil level checking procedure. Using the chart below, let your bike idle for the time that roughly corresponds to air temperature. Next shut the engine off and allow it to sit for another few minutes.
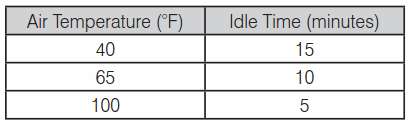
 Want to create a "Vaquero" look to your 1700 Voyager? Or just
like the streamlined look of a touring bike without the trunk? But still
want to be able to put the trunk back on easily for that cross country trip?
Here's how one AVA forum member did it.
Want to create a "Vaquero" look to your 1700 Voyager? Or just
like the streamlined look of a touring bike without the trunk? But still
want to be able to put the trunk back on easily for that cross country trip?
Here's how one AVA forum member did it.