Getting to know my new-to-me 91! (Warning: long)

This is for general posts and questions concerning only the Voyager XII (1200cc, Four-cylinder) Years 1986 thru 2003.

Moderators: the2knights, Highway Rider

Post Reply
User avatar
Thud300
Traveler
Traveler
Posts: 130
Joined: Thu Oct 01, 2015 12:51 am
9
Current bike(s): 1991 Kawasaki Voyager XII
1998 Kawasaki Concours
1989 Kawasaki 454 LTD
Location: Decatur, IL
Has liked: 1 time
Been liked: 1 time
Contact:

Getting to know my new-to-me 91! (Warning: long)

Post by Thud300 »

Well, as I stated in a previous post in the chat area, my long search for a Voyager XII has ended with my acquisition of a 91. Ironically, this one I picked up 12 miles from home, three days after a second 180 mile trip to look at what turned out to be essentially a parts bike. But that trip was not a complete waste of time, the gentleman was friendly and we had a good discussion, and I learned a few things about the Voyager.

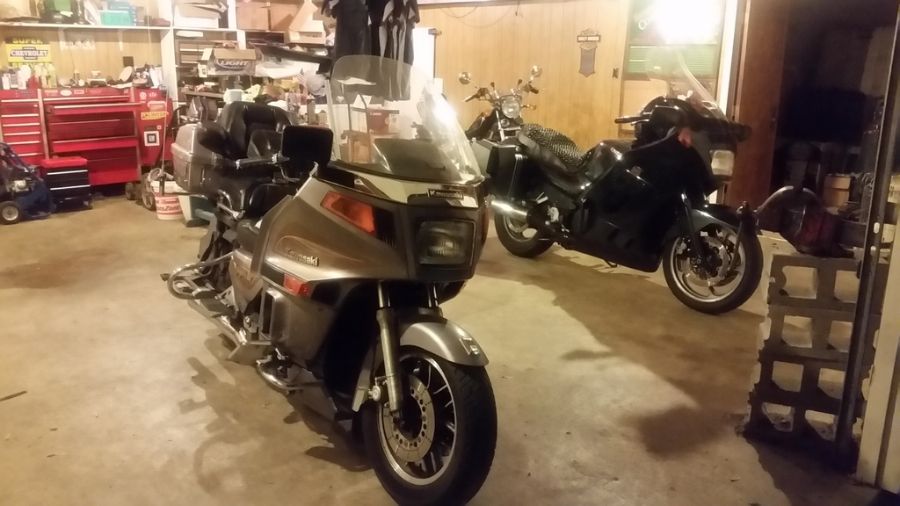
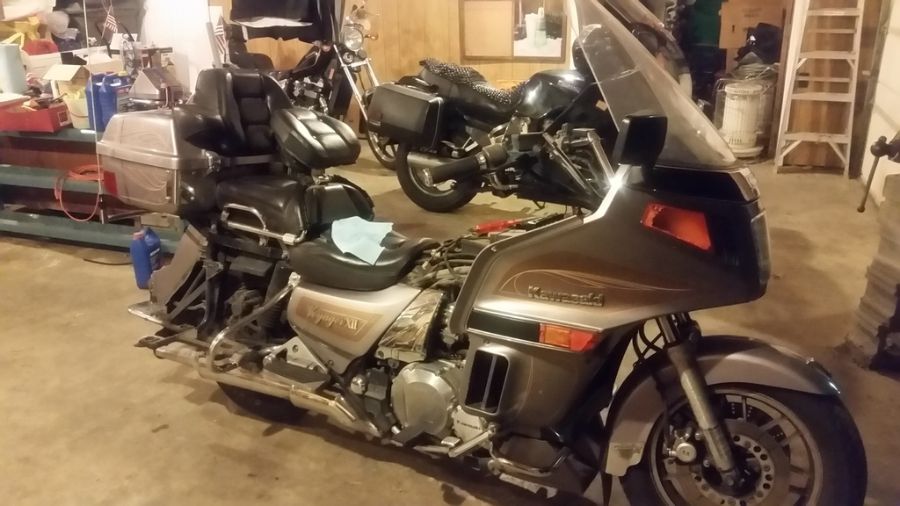
Here's what I found after getting it in my garage.

This 91 has a few issues before it's a rider, but I think they can be sorted out without too much difficulty. The first thing the seller told me was, the left case lid is missing. Could be a challenge to find another, but I'm sure one will appear sometime. He also said the fuel gauge didn't work. Okay... neither does the rest of the cluster, save for the speedometer...oh and none of the lights work either... :shock: or the horn... and about half of the fuses are not receiving power.

The engine starts and runs fine, a bit clattery on cold start... I did sneak it around the block before making the buy. Checking the coolant, well it was really low... I poured in almost half a gallon of Peak long life premix. But the system looked clean, no scale, and there was no puddle on the ground after a good warmup and an overnight sit. The fuel tank was clean on the inside, I added about a gallon of fresh fuel, some B-12 and some TCW3 oil. I also added some MMO to the crankcase, the trans and clutch on my other two Kawi's shift a lot better with it. Oil change with Rotella T6 is in the near future.

The bike had obviously been down on its left side at some time, possibly a lowside, there are scuffs on the crash bars and the center stand pedal is ground down on one side... it looks like there should be another lever for the first stage of the center stand, but it's not there. Other damage to the left side includes a missing fairing extension, the inner fairing on the left is broken below the speaker all the way across...and a scuff on the 'point' of the left upper fairing. There is also what appears to be battery acid damage on the left side of the engine and upper frame tube, nothing some cleaning and painting can't solve. The existing battery is one year old according to its label.

The radio looks like it's mounted funny in its opening, but it works! Looks like two screws that hold it in place are missing. Its 'frame' needs to be reinstalled...The rear speakers are bungeed down, that should be a fairly straightforward repair. Looks like the handlebar switches need cleaning, most started working after some cycling. Also, the bike still has its intercom cable, and it came with two matching Shoei 3/4 helmets both equipped with the 5 pin intercom system! Haven't tried them yet, but seeing them made me think of some couple in the past sharing good times on this bike, now in need of some TLC... somebody cared for this bike enough to equip it with Markland footboards, backrest and hitch.

The choke cable is in need of lube or replacement, very high effort to operate... also, the bike will crank with the kickstand down in gear and the clutch out, and there is a place for a kickstand switch but no switch.... a dangerous thing, I'm thinking the clutch and kickstand switches have been bypassed. Need to sort that out.

The headlamp aim control is stuck.

The suspension still has air in it... 8 psi front, 32 psi rear. The rear shock on the left has slipped its bushing on the final drive, a nut and washer should solve that. Tires aren't in terrible shape, but that Harley front tire has gotta go :rolling: eventually I will put either Shinkos or Dunlops on it.

Needs a rear brake rotor, somebody used a lot of rear brake. But none of the calipers are leaking. The frame tube along the exhaust that has the hitch attached to it is rusty, need to treat rust and paint. Also, missing an exhaust tip on the right side.

Other body bits so far: one of the quick release pins for the false tank is missing, and both of the bright chrome covers have broken tabs where they insert into grommets, maybe some ABS primer and glue will solve that.

So, my short list after one night is: Lights and cluster issue, center stand, switch cleaning, choke cable, rear rotor, safety switches, case lid, speaker mounts, left side bits damaged in crash, right side exhaust, fix shock bushing, fluid maintenances, etc.

And a lot of LUBING CLEANING and POLISHING along the way :-D fun fun fun!
Returning neglected Kawasakis to glory since 2014
1991 Voyager XII "Xaviera"
1998 Concours "Connimus Prime"
1989 454 LTD "Merlin"
User avatar
cranky
King of the Road
King of the Road
Posts: 1037
Joined: Wed Jul 06, 2016 12:36 am
8
Current bike(s): 2003 Voyager
Location: San Jose, KalEfornYa
Has liked: 303 times
Been liked: 80 times

Re: Getting to know my new-to-me 91! (Warning: long)

Post by cranky »

... are Ya gonna do some before and after pics? Might be nice to look back at...
'03 Voyager - http://tinyurl.com/mqtgpwp VROC pics of Gina
Cranky - Bill Snodgrass AVA # 6544. VROC # 16804
Cranked >128K miles, Mtn bike-no motor!!!
San Jose, KalEfornYa
User avatar
Thud300
Traveler
Traveler
Posts: 130
Joined: Thu Oct 01, 2015 12:51 am
9
Current bike(s): 1991 Kawasaki Voyager XII
1998 Kawasaki Concours
1989 Kawasaki 454 LTD
Location: Decatur, IL
Has liked: 1 time
Been liked: 1 time
Contact:

Re: Getting to know my new-to-me 91! (Warning: long)

Post by Thud300 »

Here are the two I snapped off last night.

Image

Image
Returning neglected Kawasakis to glory since 2014
1991 Voyager XII "Xaviera"
1998 Concours "Connimus Prime"
1989 454 LTD "Merlin"
voyager55
Elite Tourer
Elite Tourer
Posts: 820
Joined: Mon Aug 19, 2013 6:08 am
11
Current bike(s): 2003 1200
Location: Eden Prairie, MN
Has liked: 1 time
Been liked: 3 times

Re: Getting to know my new-to-me 91! (Warning: long)

Post by voyager55 »

How much did they pay you to take the bike? :gig:
Eydugstr
Traveler
Traveler
Posts: 101
Joined: Fri May 27, 2016 8:29 pm
8
Current bike(s): 1990 Kawasaki Voyager xii
2005 Kawasaki Concours
1972/77 CB750
Location: Kansas City
Has liked: 0
Been liked: 5 times

Re: Getting to know my new-to-me 91! (Warning: long)

Post by Eydugstr »

Welcome to the forum, Thud. Not too long ago bought a '90 that looks similar to yours.

The guy to talk to about the missing bits would be Carl Leo.

The guy to talk to about the radio would be Pete Franchi https://sites.google.com/site/voyagerradiorepairs/

Hope this helps!
User avatar
Thud300
Traveler
Traveler
Posts: 130
Joined: Thu Oct 01, 2015 12:51 am
9
Current bike(s): 1991 Kawasaki Voyager XII
1998 Kawasaki Concours
1989 Kawasaki 454 LTD
Location: Decatur, IL
Has liked: 1 time
Been liked: 1 time
Contact:

Re: Getting to know my new-to-me 91! (Warning: long)

Post by Thud300 »

Progress is coming along on the 91.

I made a discovery the night before that the alternator was not charging :-( along with the other dead electrics (cluster, lights, horns) and had read about the troubles with the 10 pin connector from the fuse box. So, off comes the left side fairing. The windshield was much easier than I thought it would be, and the rest of the left fairing wasn't bad either. The inner fairing is broken into several pieces, but could be at least temporarily salvaged with some Plastifix or some other ABS repair. Some tabs on the upper and lower fairings are in need of Plastifix too.

Getting to the 10 pin connector, the thing really didn't want to come apart...with lots of prying and brute force, it finally pops loose, one of the pins became resistant and welded the two halves of the connector together. Some QD contact spray and some GM terminal grease for the connector, and a bypass with bullet disconnects for the problem circuit. Put the connector back together, clean up the battery terminals, turn the key, hit the button and voila! The lights are lighting, the gauges are gauging, the alternator is alternating!
:woohoo:
The stuck choke cable and the stuck headlight adjuster freed up almost instantly with a shot of Fusion 3.0 penetrant oil, which in my experience is truly good stuff.

Still need to sort out why the dash panel is sprung away from the cluster and the radio, also found the rear brake light switch is inop. The rear caliper is a little draggy, need to rebuild or replace the caliper, needs pads and a rotor.

Date coded the tires, front tire is 10 years old :shock: rear is four. Still need to fix the lower shock mount on the left rear shock.

Lubed the speedo cable, and took a tip from a YouTube video, trimming the outer cable jacket away from the bottom ferrule to prevent water entry into the speedo drive. Reattached the cable to the cluster, and watched as water drained out from the jacket, so good call there.

More work tomorrow!
Returning neglected Kawasakis to glory since 2014
1991 Voyager XII "Xaviera"
1998 Concours "Connimus Prime"
1989 454 LTD "Merlin"
User avatar
Thud300
Traveler
Traveler
Posts: 130
Joined: Thu Oct 01, 2015 12:51 am
9
Current bike(s): 1991 Kawasaki Voyager XII
1998 Kawasaki Concours
1989 Kawasaki 454 LTD
Location: Decatur, IL
Has liked: 1 time
Been liked: 1 time
Contact:

Re: Getting to know my new-to-me 91! (Warning: long)

Post by Thud300 »

More progress today.
Got my oil and filter, went with Rotella T4 (conventional) 15w40. Oil change coming tomorrow.

The left inner fairing panel was broke into five pieces. Being a polypropylene, few adhesives will hold on it, but some research showed that some ADV riders have had success with a product called Bondic, which goes on like a super glue but only cures (fast!) when exposed to strong UV light, the kit includes a small LED ultraviolet light. I ended up finding a similar product in the TV products section :lol: of a CVS store on clearance so I grabbed a couple. It actually did work as described and adhered strongly to the pieces of the inner fairing and seems to be holding. Will report if the stuff actually holds on reassembly, or not.

Reattached the loose rear speakers to their rubber mounts with a Permatex black epoxy "plastic welder". Wasn't sure if it would work, but the hold took fairly quickly and resisted jarring after a short while.

Pulled the air filter, looks like the original, has a tiny hole in it and the perimeter seal is rotten. Temporarily servicable until a replacement is found.

Adjusted both rear brake switches, neither one was in the ballpark, now the brake lights work on rear apply :-D

Cleaned and adjusted the shift lever so a guy wearing boots can actually use it.

Removed the rest of the fairing except the right inner fairing, haven't figured out yet how the dash surround panel comes off so I can get it properly reinstalled. Advice welcome :help:

Other things that still need sorted out:

Need to replace center stand- bent
Left rear shock remounted on trailing arm bushing, retain with washer and nut
Treat and paint rusted frame tubes to trailer hitch (aka the beverage cooler holder)
Clean up acid damage to left frame upper tube and side of engine, paint both
Service brakes, replace fluids
Replace crash bars left side, scuffed
Replace front tire ASAP, probably go with Shinko 777
Polish or replace windshield
Return spring hanging out of right side peg
Clean, clean, clean, lube, lube, lube


Hoping I get to ride it tomorrow for a shakedown run. Thanks for putting up with my mini-blog here.
Returning neglected Kawasakis to glory since 2014
1991 Voyager XII "Xaviera"
1998 Concours "Connimus Prime"
1989 454 LTD "Merlin"
User avatar
Thud300
Traveler
Traveler
Posts: 130
Joined: Thu Oct 01, 2015 12:51 am
9
Current bike(s): 1991 Kawasaki Voyager XII
1998 Kawasaki Concours
1989 Kawasaki 454 LTD
Location: Decatur, IL
Has liked: 1 time
Been liked: 1 time
Contact:

Re: Getting to know my new-to-me 91! (Warning: long)

Post by Thud300 »

More on the resurrection of "Xaviera":

Started on Sunday morning with the left rear shock repair, accomplished with a c-clamp and some lube to pop the bushing back into the bottom end of the shock, then a fender washer and nut to complete that repair. Then proceeded with rust converting primer on the stanchions to the trailer hitch/cooler holder, and topcoat.

Moved on to cleaning up the battery acid residue on the left side of the frame and engine, which turned out real nice with some scotchbrite, masking paper and silver gray paint which was a real close match to the engine paint color.

Then moved on to the oil change, where another discovery was made after draining out the old grinding compound: one of the drain plug threads was stripped :-( . And as it turns out, the drain plug thread is something of an oddball, and had no luck finding an oversize self-tapping plug, so buy a 1/2-20 plug and out comes the tap and die set (aka the Oh Sh*% Kit), grease up the tap and make a new hole, the grease holds the thread chips and keeping them from getting in the engine. A little rinse-out with about a pint of Rotella for insurance, then install new filter, and fill with the prescribed 3 qts and 22 oz (or exactly 3.5L) of Rotella T4 15w40.*

*Ok, I lied. I made room for 1 ounce of Marvel Mystery Oil, which I have used in both of my other Kawis, it has a nice effect on the shift quality IMO.
Started the engine, and wow does clean oil make a difference, it didn't even sound like the same bike :-D

Moved on to figuring out why the dash looked all ersatz, so removed all the plastics and the dash assembly, and it turns out, unsurprisingly, that the 'ear' of the fairing stay that holds the LF speaker was tweaked, squishing the dash panel out of shape. DIsassembling the cluster and radio from the dash panel, the plastic had taken a set from being distorted for so long, but nothing a little heat from a soldering torch couldn't fix, so took some time to restore the shape of the dash panel, and also the radio frame that had taken a distorted set and would not lay flat on the radio face. Once the appearance of the dash was good, , it was time to reassemble the fairings.

My left inner fairing was broken into several pieces where it attaches at the top. I attempted a repair with a UV activated adhesive. It did hold somewhat better than anything else I've tried, but a couple of pieces did need to be reglued because I reinstalled the dash before putting on the inner fairing, which should have gone on first. It did hold, but weakly. Using the UV adhesive to reattach a broken pin on a chrome side panel, it worked awesome!

Note to self, next time the dash comes off, mark the connectors. It's easy to mix a few of them up. And as I went through them, I kept finding signs of greenage, so whip out the contact spray and the dielectric grease.

After many hours of work, the fairings and windshield were reinstalled, and it looks like a bike again!

Took it for a short ride just after it was done, and wow is this bike quiet and smooth. I took it out the next day for a short ride to one of my jobs. While parking, the cooling fan came on, so good to hear that.

Image

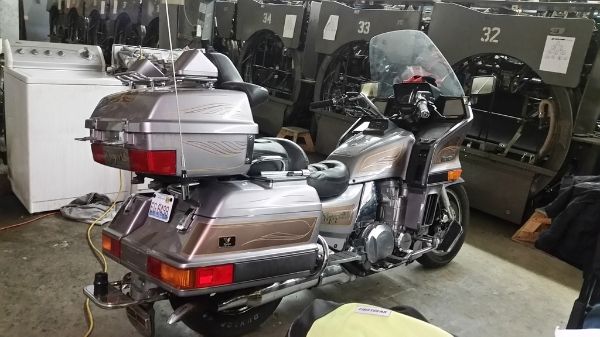
She's still plenty dirty, but she's here enjoying some indoor parking.

Made an attempt to remove the rear caliper, but the bottom bolt is frozen, so a soak in Fusion 3.0 oil for a couple days might get it. I had a lower fairing bolt seized (the one that goes in the front crash bar) and that oil allowed me to remove it after a couple days.

After work, another short ride, hovering near my house in case anything happened. Man does this bike have long legs. The self canceling signals worked; the cruise would turn on and the Set light would illuminate on pushing the button in 5th gear at about 45 mph, but releasing the throttle, the bike would slow and the Set light would go out.

Good thing I stayed close to home, because after about ten miles I stopped in a parking lot to see why I had a turn signal flashing fast. There seems to be an issue with the LF bulb circuit, it's a bit dim. Remounting the bike, suddenly there's a cloud of coolant steam coming from the left side (that pesky left side!) :!! and there's a puddle on the ground, so I hustle the bike about two miles to my garage, where it now sits awaiting diagnosis. And draining coolant on my floor. Hopefully, the trip home low on coolant didn't do any damage.

Well I wanted another project, and I got one. Aside from the sudden loss of coolant on her maiden ride, she's awesome! And over time, all the issues will be sorted out, just like how I got my other two Kawasakis.
Returning neglected Kawasakis to glory since 2014
1991 Voyager XII "Xaviera"
1998 Concours "Connimus Prime"
1989 454 LTD "Merlin"
User avatar
krasmu
Grand Tourer
Grand Tourer
Posts: 404
Joined: Thu Sep 24, 2015 3:00 pm
9
Current bike(s): 1990 Voyager Xii (zg1200)
Location: Machesney Park, Illinois
Has liked: 0
Been liked: 18 times

Re: Getting to know my new-to-me 91! (Warning: long)

Post by krasmu »

Sounds to me like you're getting this project whipped into shape. I think you made the right choice on this one. No huge issues and you seem to know your way around a bike fairyl well. Good luck.
Kirk Rasmussen
Machesney Park, Illinois

"Failure is unimportant. It takes courage to make a fool of yourself."-Charles Chaplin
User avatar
Nails
King of the Road
King of the Road
Posts: 1771
Joined: Thu Feb 16, 2017 4:37 pm
7
Current bike(s): '97 XII
'00 XT350
'85 KLR 250
'82 Silverwing Sushiguzzi
Location: New Mexico Rockies
Has liked: 228 times
Been liked: 602 times

Re: Getting to know my new-to-me 91! (Warning: long)

Post by Nails »

> at least temporarily salvaged with some Plastifix or some other ABS repair

ABS glue from the hardware store does great. I glued a gaping crack on the upper fairing corner -- had to bind it really hard with stout cord and a clove hitch, but the glue held after taking off the cord. I've fixed dozens of cracks by using a dremel and wire wheel to cut through the paint and into the plastic, and then ABS glue on a toothpick. It sanded well enough, but I used a very little Bondo on some. I also cut out from a sheet of ABS to plug holes, like the square one on the dash where the squelch control used to be. (Don't need no stinking radio.) I didn't sand that, and the ABS textures aren't identical, but I'll find a way to live with it.

> polypropylene

Are you sure the inner fairing is polypropylene? The ABS glue positively welded to it.

I think the chrome-film covered stuff might be polypropylene. My chrome piece below the windscreen had minor cosmetic damage, so I pealed all the chrome off and painted it. I used bed liner, a textured finish. Seems to stick well. (I'm getting rid of all the bling -- looks too much like a golf cart.)

> both of the bright chrome covers have broken tabs where they insert into grommets

I had one that had been repaired with Gorilla Glue -- snapped right off. Drilled a small hole through the broken-off part and into the cover, and then stuck a teeny sacrificial Allen wrench into it with some glue. I cut it off with the dremel. Think dentistry. Seems really stout, even with (again) ABS glue. (I've gone through half a $15 can of ABS glue.)
--
Nails
User avatar
ghostler
Grand Tourer
Grand Tourer
Posts: 519
Joined: Fri Jun 21, 2013 5:44 pm
11
Current bike(s): 2001 Voyager XII, 1971 Honda CB100
Asphalt, the final frontier; these are the treks of the Kawasaki Voyager; its continuing mission to explore strange new roads, to seek out new sites, new bed & breakfasts, to boldly ride where no one has ridden before.
Location: Clovis, NM
Has liked: 2 times
Been liked: 10 times
Contact:

Re: Getting to know my new-to-me 91! (Warning: long)

Post by ghostler »

Thud300 wrote:More on the resurrection of "Xaviera":
Glad to see that it is coming together and will be a good runner.
After work, another short ride, hovering near my house in case anything happened. Man does this bike have long legs. The self canceling signals worked; the cruise would turn on and the Set light would illuminate on pushing the button in 5th gear at about 45 mph, but releasing the throttle, the bike would slow and the Set light would go out.
When cruise is set, if it slows down before speeding up to set speed, cruise servo cable has too much slack. It is inside the right side of the fairing, requires disassembling the fairing to get to. Once adjusted, it should then work like a car's cruise control.

If for example climbing a hill and the cruise servo can't continue to achieve set speed after a couple seconds, it then kicks out. On level roads with gentle rises and falls, it does well. On aggressive up and down grades, like riding through mountains, it doesn't do as well. Sometimes I'll give it a little hand by rolling a little throttle. On aggressive mountain roads, I find it easier to forgo cruise until out of it.

It sounds like your cruise servo adjustment is probably way off, never was properly adjusted by factory or dealer.
George Hostler
Clovis, NM, US

Christian Motorcycle Association
Salvation Army Motorcycle Ministry, Western Territory
http://tsammcentral.org/
2001 Kawasaki ZG1200 Voyager XII
1971 Honda CB100
User avatar
Mr Jensee
King of the Road
King of the Road
Posts: 1987
Joined: Fri Dec 26, 2008 5:55 pm
15
Current bike(s): Phone 337-781-8158
Home Phone disconnected.
Previous bikes. Yamaha 180, Honda CM200T, Suzuki 1000LNKawasaki ZRX1100.
Location: Lafayette, La
Has liked: 0
Been liked: 9 times

Re: Getting to know my new-to-me 91! (Warning: long)

Post by Mr Jensee »

Wow man, how much did the previous owner hate this bike to abuse it so badly. I tip my hat to your patience reviving the beast. And the plastic of which the Voyager XII is made is indeed ABS. Important to know If you have to glue any of it.
For Voyager XII Manuals click the link below.
https://1drv.ms/f/s!Ao3K0Ai2gvglgS3l7J4pBJrjfBhc
User avatar
Thud300
Traveler
Traveler
Posts: 130
Joined: Thu Oct 01, 2015 12:51 am
9
Current bike(s): 1991 Kawasaki Voyager XII
1998 Kawasaki Concours
1989 Kawasaki 454 LTD
Location: Decatur, IL
Has liked: 1 time
Been liked: 1 time
Contact:

Re: Getting to know my new-to-me 91! (Warning: long)

Post by Thud300 »

At one time, this bike was enjoyed and well cared for, judging by the accessories and the intricate, hand-painted pinstripes. She fell on hard times and disrepair, but is now in the process of being brought back to riding shape.

The hose that blew turned out to be the lower radiator hose. Cause of failure, the hose to the coolant recovery tank was plugged, therefore the excess pressure normally released by the radiator cap had nowhere to go, so the weakest link blew out. I opened the reservoir cap, allowed my air compressor to build up to 20 psi, nozzled the hose, and no air would flow. Up to 30, still nothing. Up to 40, it finally blew out, and because I was standing on the left side of the bike near the open reservoir, my pants were instantly soaked in projectile coolant :!!
Removed and cleaned out the reservoir and made sure both hoses were clear.

I got the prescribed Dayco radiator hoses from the dollar for dollar section, proceeded to remove the fairings and the radiator, and replaced the lower two hoses. The upper hoses I will save for another time. Got the hoses cut and installed, which wasn't too bad. Then hooking up a pressure tester, discovered the system would not build up any pressure :-( and my pressure tester adapter got stuck on the fill neck, so had to remove it to remove the adapter from it. I decided to pour in some coolant and see where it came out at, and both o-ring connections were dripping at the water pump tubes :-( :-( so it looked like another ride would have to wait...

But as serendipity would have it, when I first inspected the bike and gathering all the loose bits from the various compartments, I recalled taking out a small bag with two large o-rings in it... could it be? The pick label was still on the bag, ordered from Ron Ayers in 2007, and running the Kawi part number on the fiche in the manuals section, it turns out they were the water pump tube o-rings! :-D

Radiator and hoses come back off, and some creative tools, black magic and a few invented words later, I managed to get the water pump tubes out without removing anything else, and removed the well hardened o-rings and replaced them. Reassemble, fill with Peak pre-mix, run the engine to pressurize the system, no leaks and the fan runs!
:woohoo:
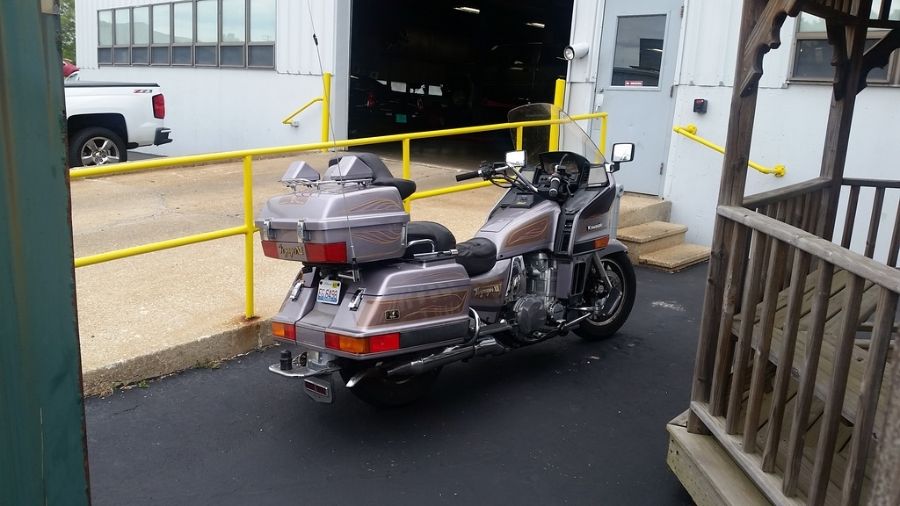
Reassembled the fairing, and went for a victory ride. Here she is at my day job the next day.

Image

Got the stuck rear caliper bolt loose with judicious use of an acetylene torch and a long ratchet. Reinstalled with antiseize, now awaiting rear caliper work and new pads, and flushing the chocolate milk out of the hydraulics. Soon a new center stand, and a pair of 777 HD's.

I've put about 70 miles on her at this writing. :-D Still more to do.
Returning neglected Kawasakis to glory since 2014
1991 Voyager XII "Xaviera"
1998 Concours "Connimus Prime"
1989 454 LTD "Merlin"
User avatar
dsmmrm
Cruiser
Cruiser
Posts: 92
Joined: Tue Jun 20, 2017 12:41 pm
7
Current bike(s): 2001 Kawasaki Voyager XII
1996 Kawasaki Vulcan 1500 Classic
Has liked: 0
Been liked: 3 times

Re: Getting to know my new-to-me 91! (Warning: long)

Post by dsmmrm »

Pretty bike. It seems that you can see the light at the end of the tunnel (and it's NOT a train). Congrats!
--
Dave Morrow
Vermilion, Ohio
small herd of kaws
User avatar
Mr Jensee
King of the Road
King of the Road
Posts: 1987
Joined: Fri Dec 26, 2008 5:55 pm
15
Current bike(s): Phone 337-781-8158
Home Phone disconnected.
Previous bikes. Yamaha 180, Honda CM200T, Suzuki 1000LNKawasaki ZRX1100.
Location: Lafayette, La
Has liked: 0
Been liked: 9 times

Re: Getting to know my new-to-me 91! (Warning: long)

Post by Mr Jensee »

Since OEM parts are becoming scarce, I would suggest doing what I have done for old bikes, shop EBAY. Do it frequently and the treasures will surprise you.
For Voyager XII Manuals click the link below.
https://1drv.ms/f/s!Ao3K0Ai2gvglgS3l7J4pBJrjfBhc
User avatar
Thud300
Traveler
Traveler
Posts: 130
Joined: Thu Oct 01, 2015 12:51 am
9
Current bike(s): 1991 Kawasaki Voyager XII
1998 Kawasaki Concours
1989 Kawasaki 454 LTD
Location: Decatur, IL
Has liked: 1 time
Been liked: 1 time
Contact:

Re: Getting to know my new-to-me 91! (Warning: long)

Post by Thud300 »

eBay is definitely a ZG 1200 owners friend. Since the last update, I ordered, painted and installed a new center stand. On a sad note, the radio surround frame either fell off during a ride or got swiped, and it appears to be made of unobtainium.

My rear speakers came undone again, reattached them using 3M Black weatherstrip adhesive. That should be the end of that. There is no substitute for 3M products.

Pulled the rear caliper, and cleaned it up for inspection. The slide pins were not stuck, the pads were not as thin as I thought, but installed an older set of EBC HH pads I recently replaced on my Concours. Cleaned the reservoir and flushed the system with fresh DOT4 fluid, which reduced but did not eliminate the slight drag noticed while parking. The caliper piston seal must be causing the slight drag, so a rebuild kit is in the future.

A new set of Shinko 777HD's arrived yesterday, but it will be a while before they get installed, as I am scheduled for my annual Advanced Rider Course this weekend, unless the state of Illinois cancels it... Meanwhile, I've accumulated about 250 miles on the Voyager just buzzing around town.

I've found that my speedometer is off by a factor of about 10%... 61 mph on the speedo equals 55 mph past radar equipped signs. Possibly a tire size issue, will recheck after the 777s are installed.

About that center stand...I've seen videos where little old ladies can pop a V-XII on the center stand, but my 250 lb butt can't seem to do it. Tires fully inflated, 40 psi in the rear shocks... guess I have to do the old Connie rear tire on a board trick...

I've made a long list of nits to get out of the bike, most of it piddly stuff. But enquiring minds want to know, what went in the rubber clip inside the trunk lid?
Returning neglected Kawasakis to glory since 2014
1991 Voyager XII "Xaviera"
1998 Concours "Connimus Prime"
1989 454 LTD "Merlin"
triton28
King of the Road
King of the Road
Posts: 1006
Joined: Fri Aug 23, 2013 1:32 am
11
Current bike(s): 1987 ZG-1200 B1
1987 ZG-1200 B1
1990 ZG-1200 B4
Location: Nova Scotia Canada
Has liked: 105 times
Been liked: 273 times

Re: Getting to know my new-to-me 91! (Warning: long)

Post by triton28 »

Type in "Voyager xii center stand, youtube" on google.
There is an 18 second video which may help.
User avatar
cranky
King of the Road
King of the Road
Posts: 1037
Joined: Wed Jul 06, 2016 12:36 am
8
Current bike(s): 2003 Voyager
Location: San Jose, KalEfornYa
Has liked: 303 times
Been liked: 80 times

Re: Getting to know my new-to-me 91! (Warning: long)

Post by cranky »

...+ 1 on needing 4 people to "get it up" on the center stand!!!!
I've had experts look at it, all they can do is shake their head and
say, "it's not supposed to be that way!!!"

I have a scissor jack, can use the center stand for a jack point, and
I can raise it easily... just one'a them things, I guess....
'03 Voyager - http://tinyurl.com/mqtgpwp VROC pics of Gina
Cranky - Bill Snodgrass AVA # 6544. VROC # 16804
Cranked >128K miles, Mtn bike-no motor!!!
San Jose, KalEfornYa
User avatar
Mr Jensee
King of the Road
King of the Road
Posts: 1987
Joined: Fri Dec 26, 2008 5:55 pm
15
Current bike(s): Phone 337-781-8158
Home Phone disconnected.
Previous bikes. Yamaha 180, Honda CM200T, Suzuki 1000LNKawasaki ZRX1100.
Location: Lafayette, La
Has liked: 0
Been liked: 9 times

Re: Getting to know my new-to-me 91! (Warning: long)

Post by Mr Jensee »

Not that difficult, a simple technique. With the bike in neutral, stand on the left side and grasp the left handlebar grip, right hand on the chrome handle by the passenger seat. With your left foot put the stand down until both bottoms of the stand are touching the pavement. Then take that same left foot and put on the secondary stand lever and push down with your weight while pulling back on the handlebar. the bike will rise and lock into place with a thud.
For Voyager XII Manuals click the link below.
https://1drv.ms/f/s!Ao3K0Ai2gvglgS3l7J4pBJrjfBhc
User avatar
ghostler
Grand Tourer
Grand Tourer
Posts: 519
Joined: Fri Jun 21, 2013 5:44 pm
11
Current bike(s): 2001 Voyager XII, 1971 Honda CB100
Asphalt, the final frontier; these are the treks of the Kawasaki Voyager; its continuing mission to explore strange new roads, to seek out new sites, new bed & breakfasts, to boldly ride where no one has ridden before.
Location: Clovis, NM
Has liked: 2 times
Been liked: 10 times
Contact:

Re: Getting to know my new-to-me 91! (Warning: long)

Post by ghostler »

I had a more difficult time setting the center stand before I replaced the OEM fork springs with Progressive. With Progressive springs the front end sits higher, so less force was required to lift the bike when pressing down on the center stand lever.

Even with shocks pressurized to maximum recommended pressure, OEM springs were shot. I guess over time like our old 1964 Ford Falcon in 1971 rear springs were badly sagging, my 2001 XII springs were sagging, too.

Don't know if that is your specific problem but could be a contributing factor to center stand setting problems.
These users liked ghostler's post:
kornj25 (Thu Jun 25, 2020 6:32 pm)
Rating: 11.11%
George Hostler
Clovis, NM, US

Christian Motorcycle Association
Salvation Army Motorcycle Ministry, Western Territory
http://tsammcentral.org/
2001 Kawasaki ZG1200 Voyager XII
1971 Honda CB100
Post Reply

Return to “General - Voyager XII (1200 Four)”