Rear Speaker Mount Repair Part 2
Moderators: the2knights, Highway Rider
- Mr Jensee
- King of the Road
- Posts: 1987
- Joined: Fri Dec 26, 2008 5:55 pm
- 15
- Current bike(s): Phone 337-781-8158
Home Phone disconnected.
Previous bikes. Yamaha 180, Honda CM200T, Suzuki 1000LNKawasaki ZRX1100. - Location: Lafayette, La
- Has liked: 0
- Been liked: 9 times
Rear Speaker Mount Repair Part 2
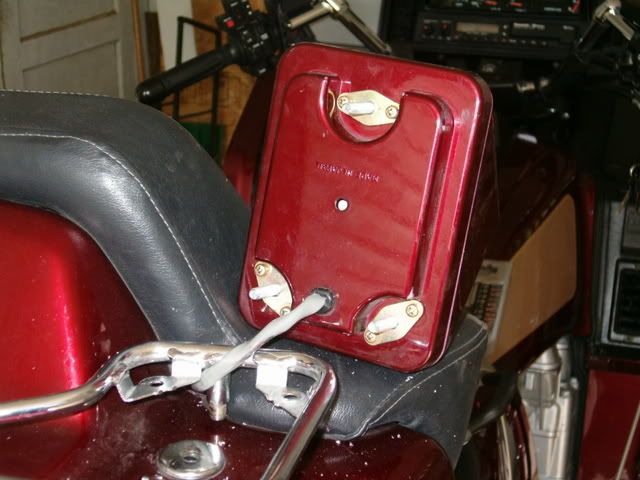
Once the bolts were in place they were snug and would not rotate. I then installed the mounting plates and bolted the top and bottom of the speaker back together.
I then screwed on the three well nuts, They have a threaded metal insert in them that matches the carriage bolts.
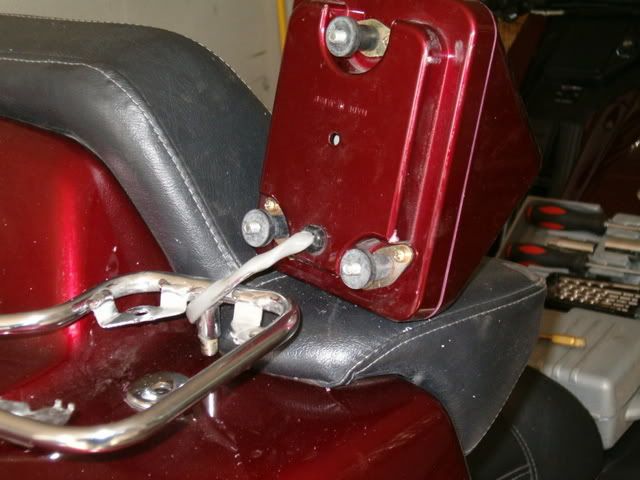
It was then a simple matter to bolt the speaker down using the new stainless steel acorn nuts. I used the original lock nuts to keep them from backing out. There was also no need to drill out anything on the rack since the carriage bolts were only slightly larger in diameter than the original threaded pieces. I remounted the speaker rack and was done. This took me about 1-1/2 hours to do with the trial and error method of mounting the carriage bolts.
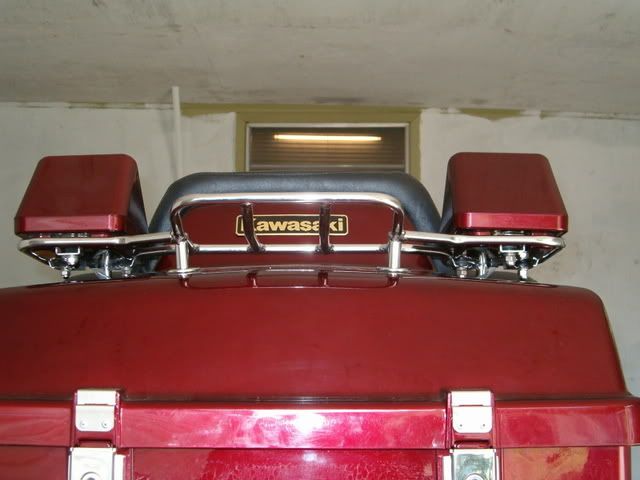
I have no doubts that before too long the left speaker will require doing as well. I want to use this for a while, make sure there is no detrimental effects before I do the other side. If there is I have another plan in the works using silicone!
Update! It is now 2014 and there are still no issues with the mounts. I have since done the same thing to the left side. Thanks for viewing!
For Voyager XII Manuals click the link below.
https://1drv.ms/f/s!Ao3K0Ai2gvglgS3l7J4pBJrjfBhc
-
- Streetster
- Posts: 11
- Joined: Sat Feb 11, 2017 3:38 am
- 7
- Current bike(s): 1999 Voyager XII
- Has liked: 0
- Been liked: 0
Re: Rear Speaker Mount Repair Part 2
So I planned to complete Mr. Jensee's mod today and had prepped all the carriage bolts as described (the well nut is 5/8ths)...however I ran into a problem because I left my racket set in my truck too far away to get too and therefore couldn't take the luggage rack off...so I had to improvise. I developed another way of accomplishing the same mod, but perhaps with a little less style
I didn't take the speaker apart, just unscrewed the rubber mounts and used a 3/8ths bit to put a hole in the metal mounts that the square parts of the carriage bolts would fit through. Then I put two well nuts on the bolt, back to back, and attached them to the speaker. This meant that I didn't have to drill through the plastic parts of the speaker. Then I assembled the speakers on the luggage rack. The downside is the difference in height between the stock and modified speakers. They sit 5/8in higher than stock due to the additional well nut. I'm hoping that the use of 2 well nuts will provide maximum vibration dampening. I'm planning on putting the second well nut under the luggage rack (so there will be one on each side of the luggage rack)when I get back to my tools so that the setup is back to stock height...if so I'll try to remember to update the forum. Bottom-line, this is a great mod and cost $10 for all 6 mounts and 2 beers
- Mr Jensee
- King of the Road
- Posts: 1987
- Joined: Fri Dec 26, 2008 5:55 pm
- 15
- Current bike(s): Phone 337-781-8158
Home Phone disconnected.
Previous bikes. Yamaha 180, Honda CM200T, Suzuki 1000LNKawasaki ZRX1100. - Location: Lafayette, La
- Has liked: 0
- Been liked: 9 times
Re: Rear Speaker Mount Repair Part 2
Just posting so it will show up in the active list.
For Voyager XII Manuals click the link below.
https://1drv.ms/f/s!Ao3K0Ai2gvglgS3l7J4pBJrjfBhc
- ghostler
- Grand Tourer
- Posts: 519
- Joined: Fri Jun 21, 2013 5:44 pm
- 11
- Current bike(s): 2001 Voyager XII, 1971 Honda CB100
Asphalt, the final frontier; these are the treks of the Kawasaki Voyager; its continuing mission to explore strange new roads, to seek out new sites, new bed & breakfasts, to boldly ride where no one has ridden before. - Location: Clovis, NM
- Has liked: 2 times
- Been liked: 10 times
- Contact:
Re: Rear Speaker Mount Repair Part 2
No doubt Mr Jensee's repair is a good alternative to OEM replacement,
I had a speaker mount again break. This time, I noticed it happened at the other end of the rubber mount. The "JB Weld" generic alternative (gray Epoxy) held, and it broke at the other end. Somewhere in its previous history, another adhesive, possibly Liquid Nails was used. I scraped away about 1/32 inch of rubber off the metal mount plate and roughened up the surface with coarse sandpaper. Did the same thing with the rubber side, after scraping the old adhesive off.
I couldn't find my Locktite generic "JB Weld", so I used 15 minute Epoxy.
We'll see how long it holds. So far, the right speaker's 2 broken mounts are holding.
George Hostler
Clovis, NM, US
Christian Motorcycle Association
Salvation Army Motorcycle Ministry, Western Territory
http://tsammcentral.org/
2001 Kawasaki ZG1200 Voyager XII
1971 Honda CB100
Clovis, NM, US
Christian Motorcycle Association
Salvation Army Motorcycle Ministry, Western Territory
http://tsammcentral.org/
2001 Kawasaki ZG1200 Voyager XII
1971 Honda CB100
- Thud300
- Traveler
- Posts: 130
- Joined: Thu Oct 01, 2015 12:51 am
- 9
- Current bike(s): 1991 Kawasaki Voyager XII
1998 Kawasaki Concours
1989 Kawasaki 454 LTD - Location: Decatur, IL
- Has liked: 1 time
- Been liked: 1 time
- Contact:
Re: Rear Speaker Mount Repair Part 2
On my 91, five of the six mounts were separated. An early attempt with Permatex Plastic Welder epoxy had good initial grab but only lasted a week before all the repairs failed.
They were reattached with 3M Black Super Weatherstrip Adhesive, which is available in a small tube for about six bucks. So far that repair is 100% successful after about a month, with about 300 miles of some rough roads and plenty of trunk opening and closing.
Warning: if you use the 3M adhesive, it wants to make gooey strings that stick to everything, so have plenty of paper towels and some acetone handy to clean up any accidental mess.Vinyl gloves wouldn't be a bad idea either.
Addendum: on today's ride my right rear speaker came loose, but I'm unsure if it was the side of the mounts that was reattached previously. or not. Trying again with the 3M, will advise.
Returning neglected Kawasakis to glory since 2014
1991 Voyager XII "Xaviera"
1998 Concours "Connimus Prime"
1989 454 LTD "Merlin"
1991 Voyager XII "Xaviera"
1998 Concours "Connimus Prime"
1989 454 LTD "Merlin"
- Scott-(Altoona, PA)
- King of the Road
- Posts: 1085
- Joined: Mon Feb 18, 2008 1:22 pm
- 16
- Current bike(s): 2001 Voyager XII
- Location: Altoona, PA
- Has liked: 83 times
- Been liked: 140 times
- Contact:
Re: Rear Speaker Mount Repair Part 2
Well I noticed that one of my rear speaker mounts had broken/separated. I removed the speaker w/all 3 mounts and on my kitchen counter began surgery. The one that was separated was obvious and I wasn't worried as I had fixed it 7+ years ago using E6000 adhesive, very pliable/rubber like when cured. After all if it held for over 7 years, why struggle to meat the minimum order $ amount for free shipping to justify the cost of replacements!
While performing surgery on that mount I was able to see the other needed addressed as well, while not yet separated it was cracked so I attacked it with a tooth pick and E6000 also. For Giggles and Grins I removed the 3rd and what to my surprise, this 18 y/o component too was showing signs of future failure. Slam Bang and 24 hours of curing and all 3 are good to go (hopefully for 7 or more years). Now time to pull the other speaker, after all the bike is 18 years old. Who knows how long those parts were setting on a shelf till that particular box was pulled for production. I would suggest that next time you approach or dismount your ride, give your rear speakers a little wiggle and look/eyeball them to see if you need to address this small overlooked issue.
I guess we aren't the only things that get weaker and crack as we age!!!!
It's the little things that may get overlooked that can usually be fixed/addressed easily and inexpensively.
Looking forward to seeing all our friends next month at the rally, ride safely and make smart decisions.
Mid-Atlantic Voyagers chapter secretary {"scribe"}
2001 Voyager XII
We may not know them all, but we owe them all! Thank a Veteran today!
2001 Voyager XII
We may not know them all, but we owe them all! Thank a Veteran today!
- Mr Jensee
- King of the Road
- Posts: 1987
- Joined: Fri Dec 26, 2008 5:55 pm
- 15
- Current bike(s): Phone 337-781-8158
Home Phone disconnected.
Previous bikes. Yamaha 180, Honda CM200T, Suzuki 1000LNKawasaki ZRX1100. - Location: Lafayette, La
- Has liked: 0
- Been liked: 9 times
Re: Rear Speaker Mount Repair Part 2
Guys I had tried all those things before coming to the conclusion I needed a better alternative. My fix has lasted several years now and shows no sign of coming loose. How could it, it is bolted now directly to the mounts. I wish I could find the first half of this tutorial, they need to be together.
For Voyager XII Manuals click the link below.
https://1drv.ms/f/s!Ao3K0Ai2gvglgS3l7J4pBJrjfBhc
-
- Newbie
- Posts: 3
- Joined: Thu Jun 25, 2015 2:16 am
- 9
- Current bike(s): 2003 kawasaki voyagerXII
2017 BMW F800GT - Has liked: 0
- Been liked: 0
Re: Rear Speaker Mount Repair Part 2
Thank you Mr Jensee
I was able to get the same parts as you from
Lowes in Canada for $50.00 but I used brass
Acorn nuts.
Thanks again!
I was able to get the same parts as you from
Lowes in Canada for $50.00 but I used brass
Acorn nuts.
Thanks again!
- VoyKimmer
- Grand Tourer
- Posts: 526
- Joined: Mon Mar 03, 2008 12:47 am
- 16
- Current bike(s): 2002 Voyager XII
1996 Voyager XII - Location: Gurnee, Illinois
- Has liked: 0
- Been liked: 104 times
Re: Rear Speaker Mount Repair Part 2
I’m sorry to say Mr Jensee is no longer with us. He’s with the Lord . God loves you Michael .
Rest In Peace
Rest In Peace
- ghostler
- Grand Tourer
- Posts: 519
- Joined: Fri Jun 21, 2013 5:44 pm
- 11
- Current bike(s): 2001 Voyager XII, 1971 Honda CB100
Asphalt, the final frontier; these are the treks of the Kawasaki Voyager; its continuing mission to explore strange new roads, to seek out new sites, new bed & breakfasts, to boldly ride where no one has ridden before. - Location: Clovis, NM
- Has liked: 2 times
- Been liked: 10 times
- Contact:
Re: Rear Speaker Mount Repair Part 2
Sorry to hear that, VoyKimmer, my condolences. If he knew the Lord, then those who also know the Lord will meet up with him.
1 Thessalonians 4:16-17 WEB wrote:For the Lord himself will descend from heaven with a shout, with the voice of the archangel and with God’s trumpet. The dead in Christ will rise first, then we who are alive, who are left, will be caught up together with them in the clouds to meet the Lord in the air. So we will be with the Lord forever.
- These users liked ghostler's post:
- cushman eagle (Mon Aug 01, 2022 12:54 am)
- Rating: 11.11%
George Hostler
Clovis, NM, US
Christian Motorcycle Association
Salvation Army Motorcycle Ministry, Western Territory
http://tsammcentral.org/
2001 Kawasaki ZG1200 Voyager XII
1971 Honda CB100
Clovis, NM, US
Christian Motorcycle Association
Salvation Army Motorcycle Ministry, Western Territory
http://tsammcentral.org/
2001 Kawasaki ZG1200 Voyager XII
1971 Honda CB100
- SgtSlag
- King of the Road
- Posts: 1056
- Joined: Mon Oct 04, 2010 10:04 pm
- 14
- Current bike(s): 1993 Voyager XII (2010)
(2006-2012: 1979 Honda CB750K)
(2008-2010: 1983 Kawasaki 440LTD, belt drive) - Location: Minnesota
- Has liked: 23 times
- Been liked: 238 times
Re: Rear Speaker Mount Repair Part 2
Please. Post this in the General forum. We need this front, and center, not buried. He was a great asset to this site, and to all of the members, here. Thank you. Cheers!
SgtSlag
1993 Voyager XII
1993 Voyager XII
- ghostler
- Grand Tourer
- Posts: 519
- Joined: Fri Jun 21, 2013 5:44 pm
- 11
- Current bike(s): 2001 Voyager XII, 1971 Honda CB100
Asphalt, the final frontier; these are the treks of the Kawasaki Voyager; its continuing mission to explore strange new roads, to seek out new sites, new bed & breakfasts, to boldly ride where no one has ridden before. - Location: Clovis, NM
- Has liked: 2 times
- Been liked: 10 times
- Contact:
Re: Rear Speaker Mount Repair Part 2
Not sure where exactly to post this, but a request and suggestion. In the Cox Engine Forums (you know, about .049 engines, etc.), when Admin gets wind of a member has passed away, under their name they have their forum status replaced with "Rest in Peace" in gray. For example, Mr. Jensee's name currently has "King of the Road". If possible, if this posting status title could be replaced with "Rest in Peace", would allow new forum members and those who have not heard yet, know.
- These users liked ghostler's post:
- Scott-(Altoona, PA) (Tue Aug 02, 2022 1:15 pm) • cushman eagle (Wed Aug 03, 2022 12:43 am) • GrandpaDenny (Wed Aug 03, 2022 8:12 pm)
- Rating: 33.33%
George Hostler
Clovis, NM, US
Christian Motorcycle Association
Salvation Army Motorcycle Ministry, Western Territory
http://tsammcentral.org/
2001 Kawasaki ZG1200 Voyager XII
1971 Honda CB100
Clovis, NM, US
Christian Motorcycle Association
Salvation Army Motorcycle Ministry, Western Territory
http://tsammcentral.org/
2001 Kawasaki ZG1200 Voyager XII
1971 Honda CB100